Monday, June 24, 2013

Dresser and a Story: No Sanding with Chalk Paint?

For awhile, it was just dressers, dressers, dressers.  I like the flat surfaces that dressers present to me.  I like the functionality of the dresser and the versitility to use it in the bedroom, dining room, foyer, office or living room.  Storage:  people need it.

My buying history suggests that I will buy an old dresser in need of love as long as it is about $40 or less.  I don't mind driving a distance to pick it up, as long as it's good looking, has dovetail joints and the seller promises all of the drawers work!  I live on the outer edges of the Bay Area, so driving awhile to get good stuff is sometimes necessary (it takes me 30 minutes to get to Whole Foods).

So, I saw this sweet set of dressers in what might be called the Duncan Phyfe style.  The curves and hardware reminded me of my (Dutch grandfather) grandparents' dining room furniture.  And there were TWO dressers (high boy and chest of drawers) going for $50.  Sweet.  And, just to make it more fun, the name of the seller was clearly of Dutch origin.  So, I drove out to pick up the pieces.  In the end, she only wanted to sell one, so I took it.  The woman-girl had a story.  Meeting her seemed to be somehow meant to be.  Anyway, the dresser was pretty beat up, but I brought it home and decided to see what all the fuss is about chalk paint.

Being thrifty, I did not want to spend big money on the commercially available boutique chalk paints.  So, I searched for chalk paint recipes and mixed up my own.  I bought plaster of paris from ye-olde-home-depot, mixed it up with water and oops paint, and voila!  Chalk paint.  Custom Chalk Paint.  Now, something appealing about this nifty paint is that you supposedly do not have to sand down your piece before painting.  Now, that's a big deal.  Sanding and prepping can take longer than the actual painting or staining.  As cathartic as sanding can be, I would happily skip it from time to time if I could...

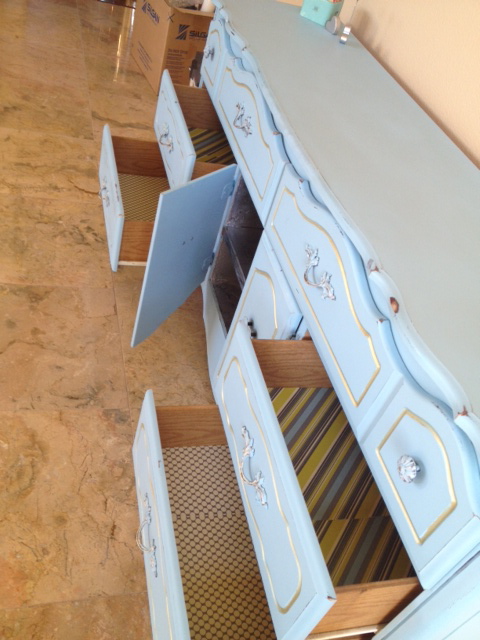
So, I did.  I skipped the sanding.  I just washed the dresser, took off the hardware, decided on a two tone paint color scheme and started painting.  Chalk paint goes on a little rough.  The plaster of paris makes the paint feel like it's a little like stucco, more like paint, but a little like stucco or even like the skim coat you put over fresh drywall.  Anywho, it's got some sweet texture, and it gives the color a little bit of variation and depth.  I like it.  It dries really fast too.  So, you can move right on to the next coat after the first is finished.

When I was satisfied with the paint job, I used some citrus furniture wax to protect the finish.  This final step really helps enhance the depth of color and texture.  And, if you apply a few coats of wax and buff, it's a pretty durable finish too.  I used my orbital sander as a buffing machine with a soft fluffy cover where the sandpaper normally goes.

So, as I spent my hours painting 2-4 coats of paint on this lovely dresser, I went back and forth in my mind about whether I should have sanded before painting.  I came to the conclusion that, if there are big niks and gouges in the surface of the wood, then yes, sanding is called for.  If the piece is fairly smooth, a good cleanin' is all it needs if you're using chalk paint.

Elyse:  here is your Grandmother's old dresser.  What do you think?  Peace to you.


Monday, February 18, 2013

Grey Wash - How To

I started painting cheaply acquired old wood furniture out of necessity more than anything.  Now it's a hobby.  When I was in middle school or so, I needed a table in my bedroom.  I can't remember what for, but it was probably that I needed a table to put my boom-box on.  Well, what I had was less of a boom box and more of an old AM/FM radio with crusty bits of mortar stuck to it.  But, it picked up the FM signal, and it was the only way for me to listen to loud music in my room at night, like any good teenager would.

Anyway, I wanted a table to put it on.  I'm sure I didn't even ask my parents to buy me a little table (I knew they wouldn't).  But, sitting in our garage, there was an old wooden chair that may have once lived in my grandparents' kitchen.  Its back support had broken off, and just one or two of the spindles was still attached to the seat.  I decided to remove the spindles and make a table out of it.  And then I painted it pink, Pepto pink.  Same as the walls.  I liked it.

That was my first memory of painting wood furniture.  It was born out of necessity then, and reborn out of perceived necessity again about 10 years ago...I wanted cool decor and furniture, but I didn't want to spend buckets of money doing so (and I never had buckets to spend either).  And, in the process, I discovered that I love, love, love searching for, buying, sanding, painting and sealing other people's old junk furniture =)  Finally, a hobby!  And a practical one that suits my practical nature to boot!

Recently, I bought a $40 dresser (to be shown in a later post) that was probably made in the 1960's.  Solid wood.  Dove tail joints on all of the drawers.  It had a couple of scratches and the drawers were lined with Raggedy Ann & Raggedy Andy contact papers.  I painted it lavender, then decided it was way too bright.  I decided to try a new technique, similar to white washing.  I grey washed over the lavender.  I loved it, and so did my daughter (6).  I wanted to sell the dresser and get some cash to spend on more junk treasures.  Miss Belle lobbied to make it hers. We had to make a deal:  if the dresser didn't sell by the end of the following weekend, it was hers.

No one bought it.  It only took one more entire week, but the Mr. and I hauled it up to Miss Belle's room.  She was delighted!  I wished I had a couple hundred bucks in my pocked instead, but it was great to see her excitement too.

That very night...I got a very enthusiastic buyer for the lavender grey-washed dresser.  Damn!  It was no small task getting that thing up all of the stairs.  And, I couldn't possibly disappoint Miss Belle.  I had to tell the interested party that it was gone.

Then I had a great idea!  I could take a chance and offer to find her another dresser and fix it up for her.  Surprisingly, she was totally into the idea!  She didn't want to buy a "new" piece, and she was willing to wait for the right dresser to come along and get all prettied up.  My first "custom" piece!!!

Hooray!  So, I drove out to Oakland and picked this baby up for a very, very small amount of money from a nice lady who was moving to the East Coast with her 3 year old son.

I fixed her up, and here she is...see below to find out what I did to achieve this aged look (inspired by Restoration Hardware).


I sanded took the sweet hardware off, sanded her down, and vacuumed her out.  Well, I vacuumed her out after removing the 127 thumb tacks I found sliding around inside after pulling the drawers out!  Score!

Then, I took a little bit of grey/gray paint (free oops paint samples) and mixed it with water.  It was close to 1/3 paint, 2/3 water.  But, honestly, I just added water until it seemed like I could spread it on and wipe it off without removing all of the color.  Then I painted the mixture on, let it sit for a minute or two and wiped it off with a cloth (diaper).  Then I decided that I liked how it looked when I wiped the dresser back and forth with the cloth I had used to wipe the diluted paint off with.  I did this, let the coat dry for a day, then did another coat or so until I liked the way it looked.  I wanted to leave a little of the natural wood color showing.  Then voila!  I achieved what looked to me like the Restoration Hardware weathered/reclaimed wood look.

I let it dry for a few days.  Then I added a coat of wax with a brush, let it sit for 5 minutes and then buffed it with a cloth.  After awhile it occurred to me that some nice paper in the drawers would make it special.  Hello pretty scrapbook paper!  I sprayed the back of the paper with spray adhesive and stuck it in the drawers.  The buyer absolutely loved it, and so did I!

And, it felt pretty cool to custom finish a dresser for someone too.  Yay!  Can I make a few nickles upcycling and refinishing furniture while relieving my husband of his ongoing fear that our home will be overtaken by a growing furniture collection/warehouse?


Saturday, February 9, 2013

Sometimes I take a chance on a piece of furniture.  The chance I take is that, while it looks good in pictures it might be beyond repair (with my skills and tools), but I decide to go get it despite the fact that it's an hour-long drive away.  Yep.  I sometimes drive for an hour each way to pick up a "free" dresser.  Granted, I can often combine several errands into one trip, but it's still a chance I'm taking.  Gas isn't cheap, and if the piece is DNR (Do Not Resuscitate), then I've wasted gas/money.  But, I do like an adventure.  And, some days I need a reason to get out of the house, leave the dishes and laundry behind, get in the SUV, sip a cup of coffee and put on a podcast.  It's almost like a mini-vacation.  I like to drive, when there is no traffic.

This dresser was one of those chances.  Its pictures made it look real purdy.  According to its previous owner, all the drawers worked perfectly, and it was in fine, used condition for $40.  OK.  I'm game for a drive.  I'll take a chance.  But, when I came face to face with the beast, it appeared to be covered in a veneer so thin and so cheap looking that I could've sworn it wasn't much more than wallpaper or self-adhesive drawer/shelf liner.

I really should have taken more pictures of just how cheap the finish was on this beastie.  But alas, this is the only one I took!  The lines were so enticing.  The hardware looked lovely, and since I had driven all the way, excited for a new project, I couldn't say "no thanks."  I bought her, took her home, roughed her up and listened for her to tell me how she wanted to be dressed.  It took a little while, and sometimes I wasn't sure it was going to work out, but with the help of some fabulous primer (Sherwin Williams Adhesion Primer), a sweet orbital sander and a bit o free time, I uncovered her beauty!

I'm not going to do a full tutorial on how it all happened, but I will say that I had to come up for a plan to deal with the brass hardware.  Because of the initially cheap construction (probably assembled at home), some of the drawer handles had been glued in and would not come out!  I couldn't really paint the drawers without also painting those glued-in pulls, so I went with it!  I tried to give them that antique patina type look that I've seen on other more authentic looked French Provincial pieces.  This is what happened....
Follow Me on Pinterest
I am happy with the result.  Here is the beastie all dressed for the ball.  I think she is a beauty.

What do you think?  What color would you have chosen?
Follow Me on Pinterest


Monday, January 28, 2013

Shiny Happy Vintage

A month ago, I picked up a free table via a Craigslist post.  It was dark outside when I arrived at the poster's little house.  I figured, no matter how bad of shape it was in from sitting in their back yard, it didn't matter, because after all it was free! (Minus the fuel and effort.)  Once I got her home and tried to sand her down, I realized this table had been used and abused to a degree I could not have imagined!  Was it used a s a work bench in the garage, or were the kids just animals at the dinner table?

After sanding, washing, scraping, wrestling and trying to smooth out the gouges for the better part of a Sunday, I finally got tired of trying to identify and remove the strange "wood"-turned-goo covering the table top.  I took more drastic measures than my orbital sander and 60 grit paper.  I got out the plane.  Yep.  I just planed off the entire top layer of crap veneer and uncovered the cheap stuff (plywood, pressboard, something like that).  It was an improvement!  I should've just started with that plane on the table top in the first place...

But then, what to do with the beautifully curvaceous legs?  They cannot be improved with the plane.  The curves are plane prohibitive.  Sanding-painting- priming, my typical formula, are probably not going to work.  I started sanding anyway, hoping the "veneer" would not turn to gummy goo like it had on the table top.  It didn't turn to goo!  Hooray, the legs seem to be made of actual wood!  But, it was a pain in the neck anyway trying to sand curvy gouged legs into smooth paintable legs.  What to do?  Avoid & hope for an enlightened solution. Work on one of the other projects underway in the garage.  Hello giant $5 framed mirror and silver spray paint!

And, then for some reason I came across a picture of a silver piece of furniture online.  I clicked.  I learned.  Aluminum foil used like faux silver leaf looks vintage glam on the shiny night stands done by Red Hen Home.  Why not try this on my free table legs.  If it fails, well, the table was free anyway!  I've got nothing to lose.  Novelty is fun.  Fun makes me happy (happy and fun are things I'm learning to do from my 3 1/2 year old son).  And, part of a roll of heavy duty tin foil was already sitting in my kitchen waiting for it's destiny.  Wall paper paste on the other hand required a trip to the DIY store.  No problem.  Grandpa is visiting for the month, so the kids can stay at home while I go on a shopping adventure all alone!  Bonus:  a $2 can of oops paint in an appealing color:)

So, I tried the aluminum foil as silver leaf job and vintaged up a table leg with some black acrylic paint rubbed on and off.  I think it looks pretty cool.  My "we're-not-creative-people"-Dad was even surprised at how authentic and cool it looked! I think I'll put a few coats of poly or varnish on top to protect the table's gams.  And since my dining room is currently empty (sold the zebra 50's oak set I did last winter), I might even be allowed to keep this little chic in the nest for awhile.  We'll see what Mr. Flourish Vintage Furniture has to say about that...